标签 windows 下的文章

在Linux里使用 chntpw 编辑 Windows 注册表 - 修改远程桌面端口

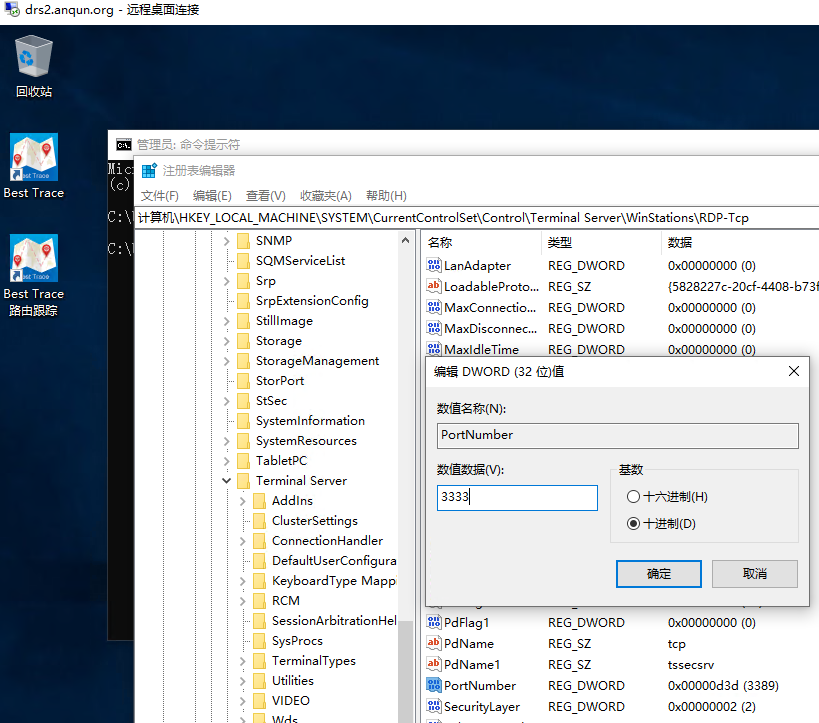
如果修改了Windows远程桌面的默认3389端口,且未能在Windows防火墙里放行新端口,重启系统后,可能无法成功连接到远程桌面。

环境:Windows 10,systemrescuecd

rdp-chntpw-1.png

过程:

1.mount /dev/sda1 /mnt/windows # 将 Windows 所在的分区挂载

2.chntpw -e /mnt/windows/Windows/System32/config/SYSTEM # 编辑Windows注册表SYSTEM部分的内容

3.用 cd 命令切换到正确的分支,ControlSet001\Control\Terminal Server\WinStations\RDP-Tcp

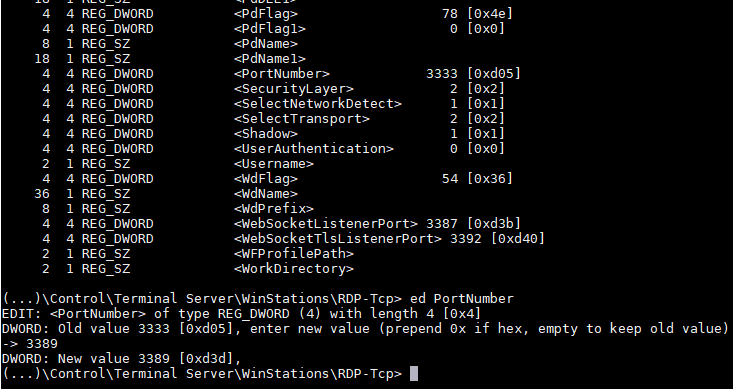
4.ed PortNumber # 编辑端口号,本例是输入新的端口号3389
rdp-chntpw-3.png

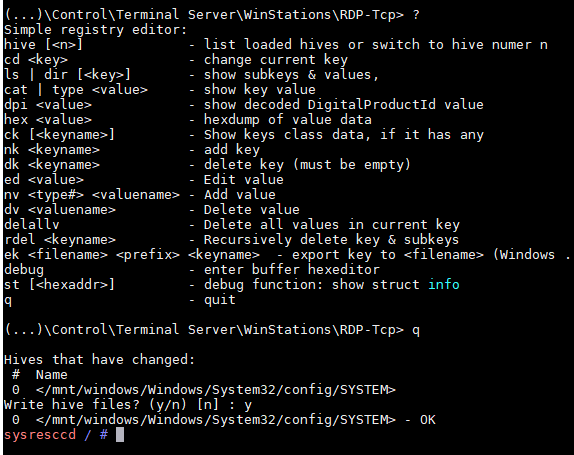
5.q # 退出,会提示是否写入
rdp-chntpw-4.png

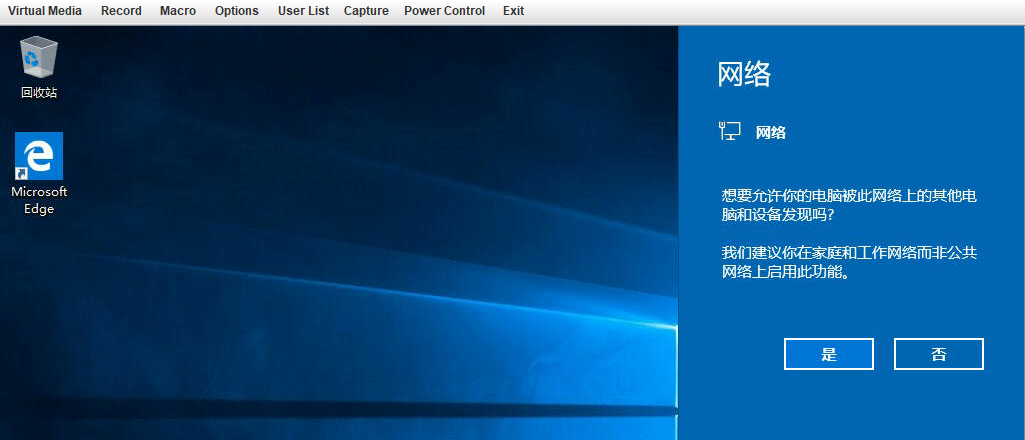
6.退出急救系统,重启机子。再次远程桌面连接,成功连接到3389端口
rdp-chntpw-5.png

参考:

用命令删除旧版Windows文件夹 - Windows.Old

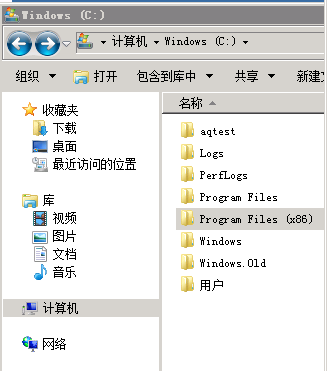
在同一个分区里安装Windows,原Windows目录会自动重命名为Windows.Old。Windows.Old目录可能会占用5GB或以上的空间,如需删除,可尝试通过命令删除Windows.Old目录。

del-windows-old-1.png

过程:

1.以管理员身份运行“命令提示符”

2.takeown /F C:\Windows.old\* /R /A # 先成为“所有者”

3.cacls C:\Windows.old\*.* /T /grant administrators:F # 获取完全权限
del-windows-old-3.png

4.rmdir /S /Q C:\Windows.old\ # 删除 Windows.Old 目录
del-windows-old-4.png

也可写成脚本执行,

takeown /F C:\Windows.old\* /R /A
pause
cacls C:\Windows.old\*.* /T /grant administrators:F
pause
rmdir /S /Q C:\Windows.old\
pause

参考:

在超微凌动服务器 - MBI-6418A-T7H 上测试安装 Windows 2003

环境:机子型号 MBI-6418A-T7H,使用英特尔 C2000 系列芯片组,默认启用 AHCI ,使用 SATA 硬盘。

测试总结:咨询超微商家,回复凌动机型仅支持Windows7或以上版本的Windows,Windows 2003系统不支持。Windows 2003是约15年前的操作系统了,现已经停止技术支持,很难在如英特尔官方网站上找到可用的 AHCI 和 内置网卡驱动。如确实需要使用Windows 2003,建议是在虚拟机里运行。

过程:

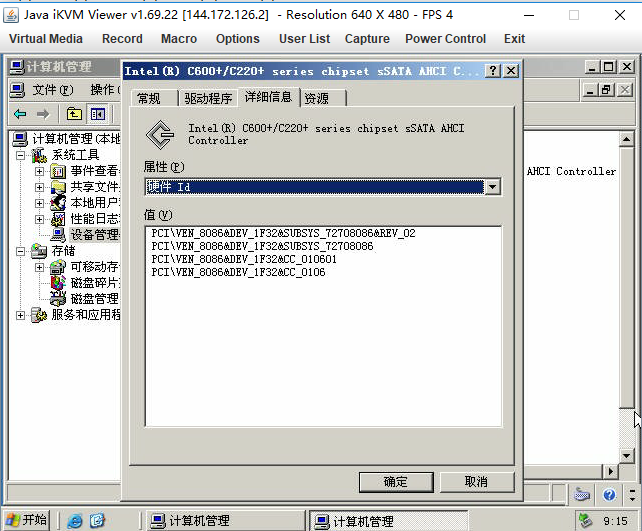
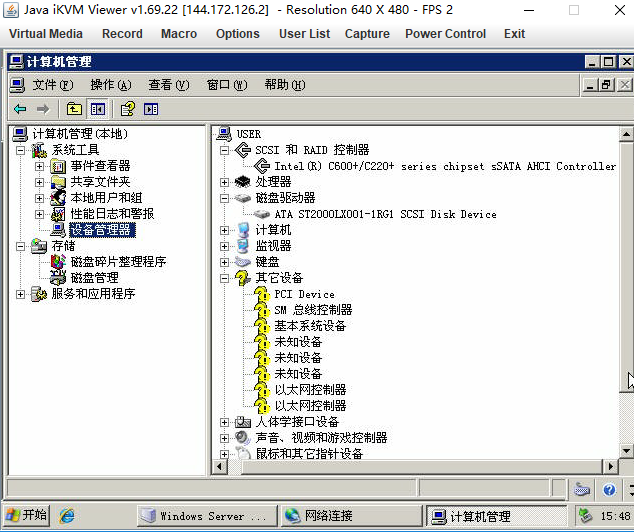
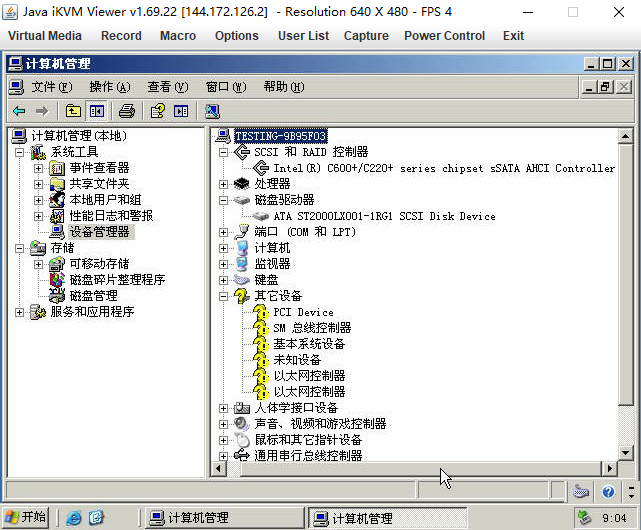
1.AHCI 设备,硬件ID 是 DEV_1F32&CC_0106 ,在网上集成的SATA驱动里,使用到的文件是 iaStorB.sys 和 iaStorF.sys
sata-1.png

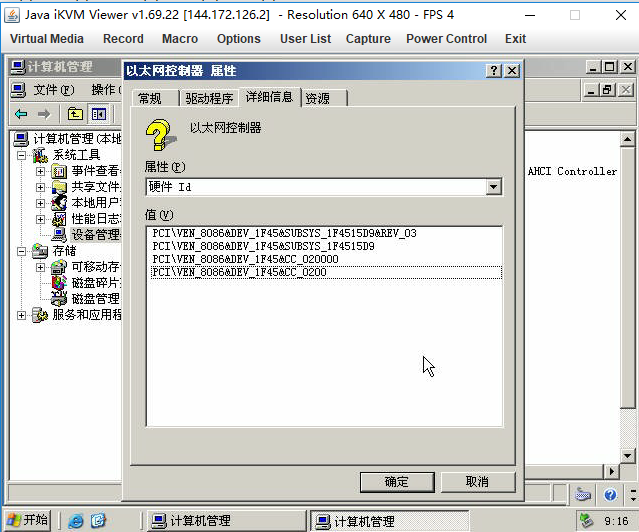
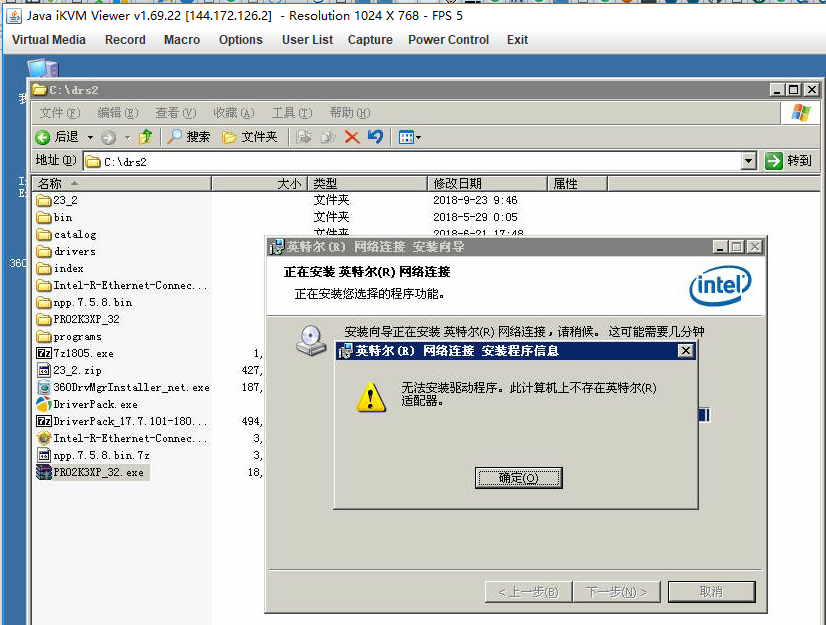
2.网卡设备,硬件ID是 DEV_1F45&CC_0200,目前没有找到适合Windows 2003系统的驱动
sata-2.png

3.简单的方法,是使用“老司机”制作好的dd Windows 2003精简和补丁包
sata-3.png

4.如果想使用自己的Windows 2003安装文件,需要模着“老司机的”dd包来掏文件,修改根目录下的 txtsetup.sif,在这里增加相应的 [SCSI],[SourceDisksFiles],[HardwareIdsDatabase]和[SCSI.Load]信息;修改 $WIN_NT$.~BT/WINNT.SIF文件内容,需要在OemPnPDriversPath里填写驱动文件的路径;在 $WIN_NT$.~BT 和 $WIN_NT$.~LS/i386 目录里增加 iaStorB.sys 的文件;在相应的路径里增加相应的驱动文件,如 DRV/I/a
sata-4.png

5.如果有英特尔官方提供的f6flpy驱动文件,也可以按微软官方文档在 [MassStorageDrivers] 里载入 SATA 驱动文件

6.试过很多方法,无法在Windows 2003里成功安装上网卡驱动
sata-5.png

参考:

在Windows 2008 R2 SP1无人值守安装配置文件Unattend.xml里使用powershell.exe

之前在Windows 2016和Windows 10的无人值守安装文件Unattend.xml里使用powershell.exe,直接这样写 powershell.exe 就可以了。但在Windows 2008 R2 SP1这样写,是不行的。一定要写powershell.exe的完整路径,即 C:\Windows\System32\WindowsPowerShell\v1.0\powershell.exe

以下是示例:

  • 设置administrator密码
  • 设置自动登录
  • 在防火墙里允许远程桌面连接
  • 将活动(插有网线)的网卡重命名(为iEthernet)
  • 为名为iEthernet的网卡设置静态IP
  • 为名为iEthernet的网卡设置DNS
  • 不允许外网访问TCP 135,137,139和445端口
<file xml Unattend.xml>
<?xml version="1.0" encoding="utf-8"?>
<unattend xmlns="urn:schemas-microsoft-com:unattend">
    <settings pass="specialize">
        <component name="Microsoft-Windows-Shell-Setup" processorArchitecture="amd64" publicKeyToken="31bf3856ad364e35" language="neutral" versionScope="nonSxS" xmlns:wcm="http://schemas.microsoft.com/WMIConfig/2002/State" xmlns:xsi="http://www.w3.org/2001/XMLSchema-instance">
        </component>
        <component name="Microsoft-Windows-TerminalServices-LocalSessionManager" processorArchitecture="amd64" publicKeyToken="31bf3856ad364e35" language="neutral" versionScope="nonSxS" xmlns:wcm="http://schemas.microsoft.com/WMIConfig/2002/State" xmlns:xsi="http://www.w3.org/2001/XMLSchema-instance">
            <fDenyTSConnections>false</fDenyTSConnections>
        </component>
        <component name="Microsoft-Windows-TerminalServices-RDP-WinStationExtensions" processorArchitecture="amd64" publicKeyToken="31bf3856ad364e35" language="neutral" versionScope="nonSxS" xmlns:wcm="http://schemas.microsoft.com/WMIConfig/2002/State" xmlns:xsi="http://www.w3.org/2001/XMLSchema-instance">
            <UserAuthentication>0</UserAuthentication>
        </component>
    </settings>
    <settings pass="oobeSystem">
        <component name="Microsoft-Windows-International-Core" processorArchitecture="amd64" publicKeyToken="31bf3856ad364e35" language="neutral" versionScope="nonSxS" xmlns:wcm="http://schemas.microsoft.com/WMIConfig/2002/State" xmlns:xsi="http://www.w3.org/2001/XMLSchema-instance">
            <InputLocale>007f:00000804</InputLocale>
            <SystemLocale>zh-CN</SystemLocale>
            <UILanguage>zh-CN</UILanguage>
            <UserLocale>zh-CN</UserLocale>
        </component>
        <component name="Microsoft-Windows-Shell-Setup" processorArchitecture="amd64" publicKeyToken="31bf3856ad364e35" language="neutral" versionScope="nonSxS" xmlns:wcm="http://schemas.microsoft.com/WMIConfig/2002/State" xmlns:xsi="http://www.w3.org/2001/XMLSchema-instance">
            <AutoLogon>
                <Password>
                    <Value>xinNIANhao2019</Value>
                    <PlainText>true</PlainText>
                </Password>
                    <Enabled>true</Enabled>
                    <LogonCount>2</LogonCount> 
                <Username>Administrator</Username>
            </AutoLogon>
            <FirstLogonCommands>
                <SynchronousCommand wcm:action="add">
                    <CommandLine>C:\Windows\System32\WindowsPowerShell\v1.0\powershell.exe -command "$wmi = Get-WmiObject -Class Win32_NetworkAdapter -Filter "netconnectionstatus=2"; $wmi.NetConnectionID = 'iEthernet'; $wmi.Put()"</CommandLine>
                    <Description>rename nic name</Description>
                    <Order>1</Order>
                </SynchronousCommand>
                <SynchronousCommand wcm:action="add">
                    <CommandLine>netsh interface ip set address name="iEthernet" static 144.172.126.32 255.255.255.0 144.172.126.1 1</CommandLine>
                    <Description>set static ip address</Description>
                    <Order>2</Order>
                </SynchronousCommand>
                <SynchronousCommand wcm:action="add">
                    <CommandLine>netsh interface ip set dns name="iEthernet" static 8.8.8.8</CommandLine>
                    <Description>set dns server</Description>
                    <Order>3</Order>
                </SynchronousCommand>
                <SynchronousCommand wcm:action="add">
                    <CommandLine>netsh advfirewall firewall add rule dir=in action=block protocol=TCP localport=135 name="Block_TCP-135"</CommandLine>
                    <Description>Block_TCP-135</Description>
                    <Order>4</Order>
                </SynchronousCommand>
                <SynchronousCommand wcm:action="add">
                    <CommandLine>netsh advfirewall firewall add rule dir=in action=block protocol=TCP localport=137 name="Block_TCP-137"</CommandLine>
                    <Description>Block_TCP-137</Description>
                    <Order>5</Order>
                </SynchronousCommand>
                <SynchronousCommand wcm:action="add">
                    <CommandLine>netsh advfirewall firewall add rule dir=in action=block protocol=TCP localport=139 name="Block_TCP-139"</CommandLine>
                    <Description>Block_TCP-139</Description>
                    <Order>6</Order>
                </SynchronousCommand>
                <SynchronousCommand wcm:action="add">
                    <CommandLine>netsh advfirewall firewall add rule dir=in action=block protocol=TCP localport=445 name="Block_TCP-445"</CommandLine>
                    <Description>Block_TCP-445</Description>
                    <Order>7</Order>
                </SynchronousCommand>               
                <SynchronousCommand wcm:action="add">
                    <CommandLine>netsh advfirewall firewall add rule dir=in action=allow protocol=TCP localport=3389 name="Allow_TCP-3389"</CommandLine>
                    <Description>Allow_TCP-3389</Description>
                    <Order>8</Order>
                </SynchronousCommand>                                                                                                  
            </FirstLogonCommands>          
            <UserAccounts>
                <AdministratorPassword>
                    <Value>xinNIANhao2019</Value>
                    <PlainText>true</PlainText>
                </AdministratorPassword>
            </UserAccounts>
            <OOBE>
                <HideEULAPage>true</HideEULAPage>
                <SkipMachineOOBE>true</SkipMachineOOBE>
            </OOBE>
            <TimeZone>China Standard Time</TimeZone>
        </component>
    </settings>
    <cpi:offlineImage cpi:source="catalog:d:/temp/install_windows server 2012 r2 serverdatacenter.clg" xmlns:cpi="urn:schemas-microsoft-com:cpi" />
</unattend>

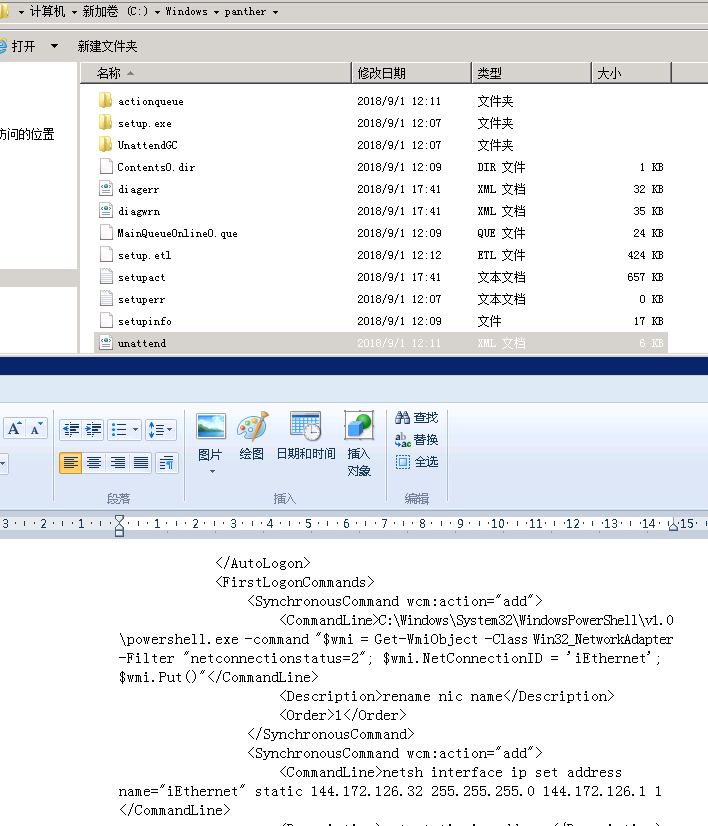
图1:安装好系统后,可以查看 C:\Windows\panther\Unattend.xml 文件内容,回看设置
Unattend-windows-1.png

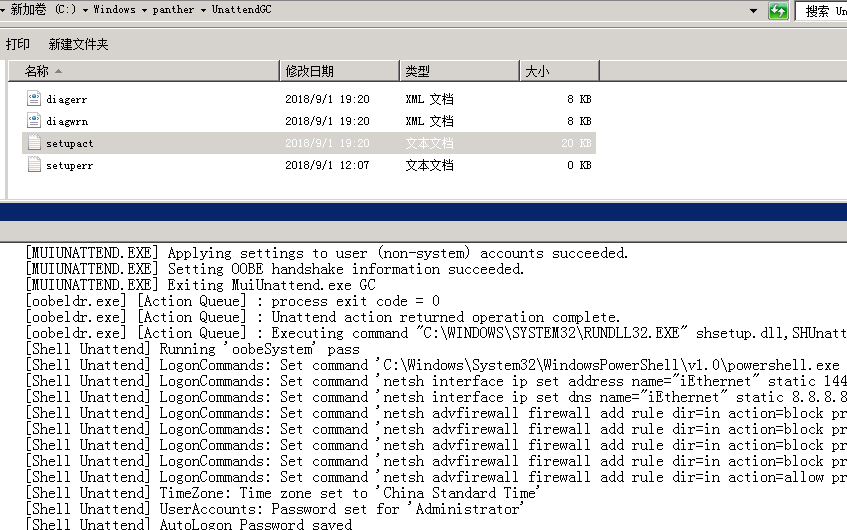
图2:C:\Windows\panther\UnattendGC\setupact.txt 可以查看无人值守安装准备内容
Unattend-windows-2.png

参考:

drserver.net - 制作Windows 10系统的dd包 - 含网卡和设置静态IP

环境:drserver.net 超微主板的凌动服务器($20.00);Windows 10安装ISO文件;Dism++;7-zip;网卡驱动文件;DeployVHD

思路:

1.下载好Windows 10安装ISO文件,如 cn_windows_10_business_edition_version_1803_updated_jul_2018_x64_dvd_12613133.iso

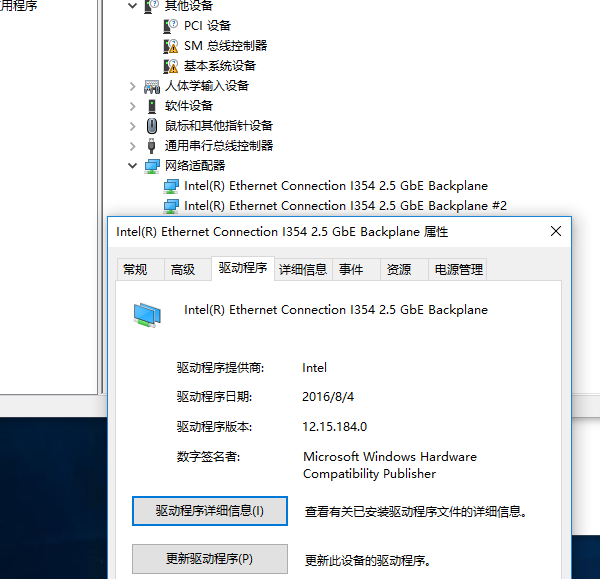
2.按“蜂鸣器”博客里提到的方法,通过Dism++制作好包含“intel ethernet connection I354 2.5 gbe backplane”网卡驱动的映像文件,将映像文件释放到vhd
dd-windows10-3.png

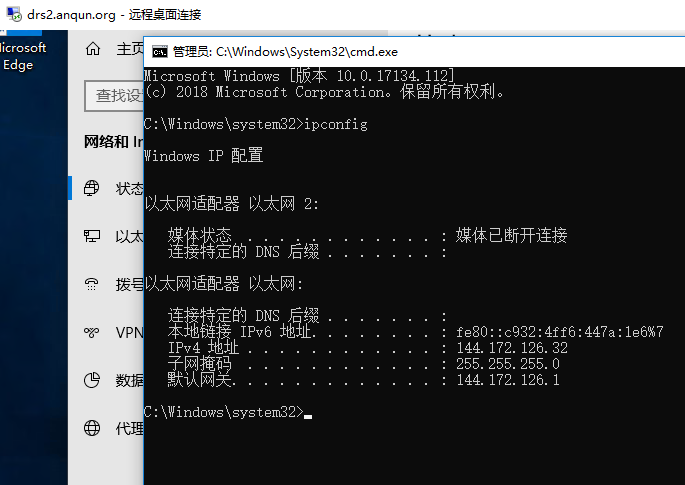
3.通过DeployVHD,应用无人值守配置文件Unattend.xml,启用远程桌面,且允许通过Windows防火墙,设置管理员administrator的密码,设置自动登录,设置“以太网”的网卡静态IP。如果是设置为中文语言的,需要留意/Windows/panther/Unattend.xml的文件内容,因为汉字的网卡名称可能会保存异常,否则可能在安装时会提示无人值守文件检查失败
dd-windows10-2.png

4.压缩包含有无人值守安装设置的vhd文件。在机子上安装测试,通过
dd-windows10-1.png

/Windows/panther/Unattend.xml 文件内容:

<?xml version="1.0" encoding="utf-8"?>
<unattend xmlns="urn:schemas-microsoft-com:unattend">
    <settings pass="specialize">
        <component name="Microsoft-Windows-Shell-Setup" processorArchitecture="amd64" publicKeyToken="31bf3856ad364e35" language="neutral" versionScope="nonSxS" xmlns:wcm="http://schemas.microsoft.com/WMIConfig/2002/State" xmlns:xsi="http://www.w3.org/2001/XMLSchema-instance">
        </component>
        <component name="Microsoft-Windows-TerminalServices-LocalSessionManager" processorArchitecture="amd64" publicKeyToken="31bf3856ad364e35" language="neutral" versionScope="nonSxS" xmlns:wcm="http://schemas.microsoft.com/WMIConfig/2002/State" xmlns:xsi="http://www.w3.org/2001/XMLSchema-instance">
            <fDenyTSConnections>false</fDenyTSConnections>
        </component>
        <component name="Microsoft-Windows-TerminalServices-RDP-WinStationExtensions" processorArchitecture="amd64" publicKeyToken="31bf3856ad364e35" language="neutral" versionScope="nonSxS" xmlns:wcm="http://schemas.microsoft.com/WMIConfig/2002/State" xmlns:xsi="http://www.w3.org/2001/XMLSchema-instance">
            <UserAuthentication>0</UserAuthentication>
        </component>
        <component name="Networking-MPSSVC-Svc" processorArchitecture="amd64" publicKeyToken="31bf3856ad364e35" language="neutral" versionScope="nonSxS" xmlns:wcm="http://schemas.microsoft.com/WMIConfig/2002/State" xmlns:xsi="http://www.w3.org/2001/XMLSchema-instance">
            <FirewallGroups>
                <FirewallGroup wcm:action="add" wcm:keyValue="RemoteDesktop">
                    <Group>@FirewallAPI.dll,-28752</Group>
                    <Profile>all</Profile>
                    <Active>true</Active>
                </FirewallGroup>
            </FirewallGroups>
        </component>
    </settings>
    <settings pass="oobeSystem">
        <component name="Microsoft-Windows-International-Core" processorArchitecture="amd64" publicKeyToken="31bf3856ad364e35" language="neutral" versionScope="nonSxS" xmlns:wcm="http://schemas.microsoft.com/WMIConfig/2002/State" xmlns:xsi="http://www.w3.org/2001/XMLSchema-instance">
            <InputLocale>007f:00000804</InputLocale>
            <SystemLocale>zh-CN</SystemLocale>
            <UILanguage>zh-CN</UILanguage>
            <UILanguageFallback>zh-CN</UILanguageFallback>
            <UserLocale>zh-CN</UserLocale>
        </component>
        <component name="Microsoft-Windows-Shell-Setup" processorArchitecture="amd64" publicKeyToken="31bf3856ad364e35" language="neutral" versionScope="nonSxS" xmlns:wcm="http://schemas.microsoft.com/WMIConfig/2002/State" xmlns:xsi="http://www.w3.org/2001/XMLSchema-instance">
            <AutoLogon>
                <Password>
                    <Value>xinNIANhao2019</Value>
                    <PlainText>true</PlainText>
                </Password>
                    <Enabled>true</Enabled>
                    <LogonCount>5</LogonCount> 
                <Username>Administrator</Username>
            </AutoLogon>
            <FirstLogonCommands>
                <SynchronousCommand wcm:action="add">
                    <CommandLine>powershell.exe Get-NetAdapter -Name *  | ? status -eq up | Rename-NetAdapter -NewName "iEtherNet"</CommandLine>
                    <Description>rename nic name</Description>
                    <Order>1</Order>
                </SynchronousCommand>
                <SynchronousCommand wcm:action="add">
                    <CommandLine>powershell.exe New-NetIPAddress -IPAddress "144.172.126.32" -InterfaceAlias "iEtherNet" -PrefixLength 24 -DefaultGateway 144.172.126.1</CommandLine>
                    <Description>set static ip address</Description>
                    <Order>2</Order>
                </SynchronousCommand>
                <SynchronousCommand wcm:action="add">
                    <CommandLine>powershell.exe Set-DnsClientServerAddress -InterfaceAlias "iEtherNet" -ServerAddresses 8.8.8.8</CommandLine>
                    <Description>set dns server</Description>
                    <Order>3</Order>
                </SynchronousCommand>                                 
            </FirstLogonCommands>
            <UserAccounts>
                <AdministratorPassword>
                    <Value>xinNIANhao2019</Value>
                    <PlainText>true</PlainText>
                </AdministratorPassword>
            </UserAccounts>
            <OOBE>
                <HideEULAPage>true</HideEULAPage>
                <SkipMachineOOBE>true</SkipMachineOOBE>
            </OOBE>
            <TimeZone>China Standard Time</TimeZone>
        </component>
    </settings>
    <cpi:offlineImage cpi:source="catalog:d:/temp/install_windows server 2012 r2 serverdatacenter.clg" xmlns:cpi="urn:schemas-microsoft-com:cpi" />
</unattend>

参考: